Sunday, December 9, 2012

I'm still here!

Hello my friends!  Sorry if it seems I have been ignoring you lately.  Just been busy and haven't had much crafting time!  I did manage to get a couple of swaps done recently though and am going to share the projects from them with you today!
The first one was a Secret Santa Swap on the cricut message board.  My person to secretly send to was Armywife25.  Along with some store bought goodies off of her wishlist, I also sent her a little 5x7 countdown to Christms chalkboard:
 
Santa and his sleigh, as well as the letters, are cut out on the Cricut, the buttons and ribbon are from my stash, and I made the little felt stocking by hand, and used it to hold the chalk!
 
I also sent her this winter wreath that I made.  When DeniseB. came down to my crop in October she was making a halloween one like this and it turned out soooo cute!  My DIL, Jessica, and I decided then that we would have to try them for Christmas or winter!  This one is actually a smaller version, because it would of taken a pretty big box to mail the bigger one!  I also thought she might have more chances of a smaller place to hang one!  The frame for it I got at JoAnn's, and then used blue tulle, tied onto the frame.  Wish they would of had a lighter shade of blue, but this one worked!  I made the snowman face freehand, and the snowflakes are cut from glittery paper using CheeryLynn Designs snowflake dies.
I see the W has slipped a little, hope it didn't ship to her that way!  The letters were cut on the Cricut.
I also made a card for her.  I used stamps from the Magnolia Christmas 2012 collection for it, and paper from my stash.  Copic markers to color, as that is my 'crayon' of choice!
The snowflakes don't show up very good on the left side but I used a punch for them.  Words are a rub on from my stash, and I also used plenty of stickles!!  here is a pic showing how I used pop dots too!  Gives it some dimension!
I hope Amanda enjoyed her stuff I made as well as the goodies I sent her to play with!
I also was in the Christmas Magnolia Swap, hosted by Scrappichic.  (she is such a good swap hostess!) My partner this month was Evelyn and since it was an 'anything ' goes round, I chose to make her a winter frame. 
Everything I used on this was from my stash (yes, I do have a LOT of stuff in my stash! and again I used plenty of stickles!  I just don't think I can do snow anymore without stickles!!  Even the chipboard snowflakes have been stickled!  Coloring was done with copic markers, frame was bought at Walmart.  My cardstock to color on it Xpress-it, which is the best I have found to use with copic markers.  Here are some close-ups of the Tilda's:


That is what I have been up to lately!  It is already Dec 9 and I don't even have my Christmas tree up yet!  Where is the time flying to so fast?  I think if this rain would turn to snow it would help a lot!  Hope your Christmas preparations are going well and that you are taking time to enjoy the season of joy!
Stop back by soon,and Happy Craftin!
Janice


Wednesday, November 21, 2012

Blitsy countdown to BLACK FRIDAY!

Hi everyone!  Sorry to of gone missing, I have just been way too busy to post anything lately.  I will try to get some posts done soon though!  I do want to take a minute this morning to tell you all though, if you are a member of Blitsy they are having a countdown to black friday all week on facebook!  And if you aren't a member of Blitsy....WHAT ARE YOU WAITING FOR?  They have great deals on craft items,  posting new ones every Monday, Wednesday and Friday!  Their shipping prices are very reasonable, and service is great!  And...if you use my link HERE to sign up at Blitsy (did I mention membership is FREE!), when you make your first purchase I will get a $10 credit!  AND, you will get your own link to share with your friends so you can get $10 credits too!!  See, it is a win win situation!!  Then, once you are signed up and have shared your link with everyone you know, be sure to check out the party on their faccebook page so ou can get in on the fun this week as they countdown the days to the big Black Friday Sale!  (And did I mention they are having giveaways too?)  See you all there!!

Happy Craftin, and I hope you all have a safe and enjoyable Thanksgivng Day!!  We all have so much to be thankful for!!
Janice

Friday, June 15, 2012

Tilda card for a 'Sister'

Hello, and thanks for stopping in!  Grab some iced tea and take a look around my blog!  Today's post is a Thinking of you card I just finished for a friend.   She is fighting breast cancer and this card is going to be from my 2 sisters, our sister-in-law, and of course myself.  Front says THINKING OF YOU and the inside says BECAUSE THAT'S WHAT 'SISTERS' DO.  Each of the Tilda's on the front would represent one of us, in no particular order.  I used my copics to color them on Xpress-it cardstock.  I colored the background using Distress ink pads (Vintage photo, Tumbled Glass and Peeled Paint) and my handy Tim Holtz tool with the foam pads.  I used a couple of small scalloped circles taped together to make stencils for the clouds.  This was my first attempt at a background this way and am pleased with how it turned out!  The fence is cut from white cardstock using my Cheery Lynn Designs 'Victorian Picket Fence' die and my Vagabond machine. 
Let me know what you think of my card and take your time looking around before you leave!  Don't forget to feed the fish for me, and stop back soon!
Happy Craftin!
Janice


Saturday, May 26, 2012

Cigar box for Tilda swap

Hello and thanks for stopping by! 
Today I am going to show you the cigar box I altered for a Tilda swap on the Cricut message board.  My partner was Sweetcreations, and I hope she liked the box and goodies I sent to her with it.
Before I start talking about the box, I have to tell you, this round brought back some childhood memories for me, as my dad was a cigar smoker and I remember his cigar boxes, and all the many things we used to do with them!  And the smell, I loved the smell of those boxes!! Everytime you opened one, long after the cigars were gone, the smell still lingered....ahhhhhh, those were the days!
But...dad has quit smoking cigars (I think) and so beleive it or not, I had to go BUY a box!  So Kim and I got our boxes at M's  No smell, and not quite the size Dad's were, but it worked!! Here is my finished box:


and the inside:


The big flower on the front is from Prima and the lace is from my stash.  I painted the box white with Folk Art acrylic paint.  I have forgotten who the paper is by, an used my last piece of it from my stash.  The teal is Bazzill.  Used a Nestabillity (with my VAGABOND) for the inside image.

My images are all colored with Copic markers.  The background is the Butterfly Background from the Chasing Butterflies collection of Magnolia.

Edwin is also from the Chasing Butterflies collection, and is Chasing Edwin!

Tilda is Beautiful Tilda from the Butterfly Dreams collection.  You can't see it in the picture, but I added a thin layer o Smooch Top Coat on the wings to give them a little shimmer!
Here is a close up of the inside:
I used Tilda with Hawaii Flower for this one, and she is from the Butterfly Dreams collection.  My partner said she likes butterflies so I kinda went with the whole butterfly theme for the box.  I hope she liked it!!
Thanks for stopping by!  Take your time and look around if you want.  Leave me some comments so I know you were here!  And please feed my fish before you go.
Happy Craftin!
Janice

Thursday, May 10, 2012

Mother's Day

This Sunday is Mother's Day...the day we all tell our mom's we love them and thank them for everything they have done for us...which we really should do each and every day of the year!!  We should thank them for soooo many things, including giving us life, a wonderful childhood, standing beside us when we made bad decisions, helping us when we wanted out of those bad situations,  showing us what a loving, caring family really is (and teaching us how to extend that love to our own children so they would grow up with the same sense of family!), making sure we went to Sunday School every Sunday, and even for fixing breakfast every Christmas morning! I know I don't thank my mom near enough for all she has done for me over the years!!  Love you Mom!
I have made a card for mom this year.  I used my copics to color 'Princess Party Tilda' from the 2012 Prince and Princesses collection.  Isn't she a cutie?  The card is a criss cross card like we did for the last round of the Magnollia Swap (see my prior post).  Those cards are fun to do!  The DP is Graphic45 from the Once Upon A Springtime Collection.  LOVE IT!!!  The solid papers are DCWV.  I used Memento ink to stamp Tilda, and the rest of the ink is TH Distress Ink 'peeled paint'.   The sentiment is from a CTMH set called 'Say It In Style' and I used gold stickles for the crown.  Ribbon and bead string is from my stash.  I hope you all (and especially my mom) like the card.  I was happy with the way it turned out and have been saving this G45 paper for just the right project, and my Mother's Day card was perfect for it! 
Now I just hope my mom doesn't look at my blog before I give her the card on Sunday!!!


Happy Mother's Day MOM!  And to all the Mom's who visit my blog, a Happy Mother's Day to you too!

found this poem on the internet...


"Happy Mothers Day"
"Happy Mother's Day" means more
Than have a happy day.
Within those words lie lots of things
We never get to say.
It means I love you first of all,
Then thanks for all you do.
It means you mean a lot to me,
And that I honor you.

         Raul

Thanks for stopping by my blog and come back again soon!  Happy craftin!
Janice


Sunday, April 22, 2012

Tilda Criss Cross card

Hello!  Thanks for stopping in to visit!  Today I want to show you the criss cross card I made for my friend Gayle on the cricut mb.  It is for the monthly Magnolia swap that Jess is hosting.  Our project this month was the criss cross card and a gift pouch inside.  I have never made a criss cross card, but was suprised at how easy they are!   Of course we have to use at least one Magnolia Tilda image on the card.  Since we send a new Tilda stamp to our partner, I decided to make my pouch to hold the stamp. My blue papers are from  DCWV  "the Stack4" and the sand paper I picked up at JoAnns  think.  The tiny shells I got at JoAnn's too.  They are Blue Moon Beads. The white ric-rac was in my stash.  I have colored the Tilda image with my copics  XPress-it cardstock.  I used my cricut to cut out the sun from yellow cardstock in my stash for the gift pouch.   My card doesn't open, not sure if they are spose to.  Mine is being used like a big envelope for the gift pouch.  Gayle wanted a beachy theme and this is what I came up with for her. 

Here is the gift pouch out of the card...


                                                             And a close up of Tilda...


Thanks for stopping by!  Take your time and look around, and please feed the fish before you leave!
Come back soon, and HAPPY CRAFTIN!
Janice

Friday, April 20, 2012

Date Night can

Hello!  Thanks for coming by my blog today!  Pull up a chair and a glass of tea and grab one of those chocolate chip cookies I just took out of the oven. I'll be serving them to a group of quilters tomorrow, so don't eat them all though!
I am also helping ( a little) with a bridal shower on Sunday.  I was ask to make the can for DATE NIGHT for the future bride and groom.  They will pass out slips of paper to each person to write a suggestion for them to do on a 'date night' and the slips of paper will all be put in the can.  Whenever they have time for a date night they will pull one out with a suggestion of something to do!!  I used the 'Life's a Beach' Cricut cartridge for the cut-outs and letters.  The can and ribbons I bought at Michael's last week.  The whole wedding and everything is a Beach theme so I think this will go well with it! 
Let me know what you think, and take your time and browse around while you are here.
Stop back by soon, and please feed my fish before you leave!
Happy Craftin!
Janice


Friday, March 30, 2012

Grandkids

Hello everyone!  Thanks for stopping by my blog today.  Sorry I don't have anything new to see, unless it has been a while since you were here last!  My grandkids from Colorado are spending 2 weeks with us, and my creating time has been put on the back burner.  Grandkids always come first, and we are really enjoying their company!  Had a lot of fun with them in Omaha when we went to meet them.  The kids just love the pool we stay at there and it is perfect for them!  I just wish we had more time to visit with Josh and Jess while there.  Here is a picture of the kids playing in the pool, and I will get back to posting crafty things after we take them back....which we will do very reluctantly next weekend!

Monday, March 19, 2012

Ruby's Blog Candy

You have got to go check out the blog candy my friend Ruby is offering!!  She has something BIG to celebrate and boy the candy she is offering reflects it!  Ruby made the Magnolia Sweden Design Team!!  What a fabulous honor for her!!  I met Ruby a few years back on the Cricut Message Boards and she is sooooo talented!!  That girl can color like I can only dream about!!  Go HERE to see her blog candy post, and while you are there, become a follower, and then check out her new DT blog and become a follower of it too!  You won't regret it!!  Like I said, she is very talented!!  CONRATS to Ruby on this dream come true, and I look forward to seeing so many neat projects in the future!!

Same, but different

Hello, and thanks for stopping by my blog today!  Last week I came up with an idea.  My stepdaughter Kim, and I would do a 'Same But Different' challenge.  I made us each up a kit of things to use and set some rules.    We could only use the papers and embellishments that were in our kit.  We could use any stamps, inks, coloring mediums, dies, and other tools that we wanted.  Our card could be for any occasion we wanted, and it had to be done by the weekend.  The kit consisted of 2 pieces of 6x12 double sided print CTMH papers, 2 pieces of 6x12 solid color CTMH cardstock in co-ordinating colors, 3 different buttons from CTMH, a 12 inch piece of sheer white ribbon, a 12 inch piece of tiny strung white pearly beads, 3 white Prima flowers, a blank card base, and a stamped Tilda image.  This was on Monday, and yesterday afternoon we got together to see our 'Same, but Different' cards!  Here is the results:


This is a close up of Kim's card:

She used Prisma colored pencils to color her image, a Magnolia Doohickey die for the tag, nestie dies, cut a strip of the striped paper to run across the bottom of her card,  a string of the tiny pearlies down the side of the card, inked her white sheer ribbon green, and colored the pearl centers of the flowers pink!  Not sure what brand stamp she used on the tag for the words.   Great job Kim!!

A close up of my card...

I used copic markers to color my image, glimmer misted my flowers with Pink Taffy, used a TPC Studio stamp for my HELLO, and Gold Stickles on the crown.  I also used 2 different Nestie dies.
My ribbon and pearly beads are run across the top together.

This was a very fun project, as neither of us had any idea how the other one was doing their card.  We weren't even sure which side of the double sided print papers we were each using, but as you can see, our tastes ran similar on that!!  I think we will have to try this challenge again sometime!!

Thanks for stopping by.  We have been having beautiful spring weather here in the midwest, hope it holds out, and winter is gone!  Raining today, but with any luck with that will come spring flowers, greener grass, and maybe even a little crafting time!!

Come back soon!!

Tuesday, March 13, 2012

Magnolia Tag

Hello again!!  Doing another post today to show you the tag I made for our March magnolia swap, hosted on the Cricut MB by Jess.  This one went to Kathy, and she got it yesterday so I can safely post it now!!  I had lots of fun making this tag, and hope she enjoys it!
My image of course is a Tilda, and the papers are CTMH.  I used a cuttlebug folder and my Vagabond to dry emboss the cardstock, and then sanded it lightly to give a little distressed look.  Tiny pearls and most everything else is from my stash.  Image is colored, as usual, with copic markers.

The piece of lace is cut from an old doily and I colored white flowers with glimmer mist to make them a shimmery pink.  Coloring my flowers could become a new passion....just buy white and make them whatever color I want!!

I can't wait to see what Jess comes up with for us to make next month!  Especially now that Magnolia has released a new collection of those darling stamps!!
Thanks for stopping by today and feel free to feed the fish for me and leave me a comment!!
Happy scrappin!

Paper bag card

Wow, sorry to be so long since I posted!!  I bet I left you all on the edges of your seats waiting to see the paper bag card I made for my Magnolia swap partner!  LOL!!!!  Ok maybe not, but here it is anyhow!

I used my copics to color the Magnolia image some cheesecloth I tea stained, and an old dictionary page to cut the flower out of with my TH die.  Papers are from my stash but I think were CTMH.

a close up of Tilda....
And this is the inside of the card:


I sent this card with some yummy goodies to my friend Becca out in CA.  I hope she liked it!

Thanks for stopping by.  Think I will make another post for today of the tag I made for the next month of this swap!

Thursday, February 2, 2012

Altered box and paper bag card

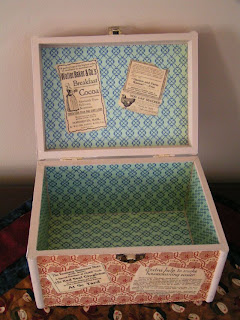
Hello to all my crafty friends and family!  Thanks for coming by today!  Grab a glass of tea (I brewed some fresh just before lunch) and take a look at the box I altered for my oldest sister, Bev, for her birthday.  I gave it to her today and by the time she left she already had 2 places in mind to put it!   I started with a little wooden box I picked up at J's, and painted the parts I wan't going to cover with paper, using a aint from my stash.  Then I used this neat paper from Graphic45 to cover the outside.  I thought it was perfect for this project!  The old looking ads are actually off the other side of the paper!  I used modge podge to put all my papers down, attach the ads, and then gave the whole thng another coat of mode podge to kind of give it a protective layer.  Did the same thing on the inside of the box, using an October Afternoon paper.  The flower on top of the box is one I made myelf!  My good friend Kathy taught us how to make them at my crop in Sept.  (Thank-you Kathy!)


The paper bag card I made for her is the first one like that I have made.  For a swap I am in we are to make one for our partner, so I decided to make Bev one for my practice one!  I thought it turned out pretty good!  The images are Tilda's colored with copic markers on XPress-it cardstock.  I used a little bit of stickles on the one on front. The papers are all from a DCWV Christmas stack I had in my stash.  I used a CherryLynn die with my Vagabond to cut the snowflakes.  I love how detailed those dies are and how well they cut!  The rest of the stamps (sayings) are all from my stash.  Oh, and I used my CTMH Dutch Blue ink pad for edging my tags and papers.


I hope Bev liked them!!
Thanks for stopping by todayand have a 'Scrappy Day'!